Dremel Instructions
Important Safety Warnings
- Safety glasses, found in the PPE drawer, must be worn during operation. Consider also using a dust mask and protective gloves.
- Tie back long hair and avoid loose or dangling clothing and jewelry.
- Allow for sufficient space (at least 6”) between your hand and the spinning bit. Do not reach into the area of the spinning bit.
- Do not touch the bit or collet after use, as they may be hot and cause burns.
- The Dremel is intended to be used only as a grinder, sander, wire brush, polishing tool, carving tool, or cut-off tool. All other uses are prohibited.
- Use only the attachments included in this kit. Outside attachments are prohibited.
- Do not use any damaged accessory. If a part of this kit is damaged, notify the consultant on duty.
- Do not use the Dremel when others are close by, as objects can fly out and hit them.
- Do not leave the Dremel running unattended.
- Do not cover the Dremel’s vents, as it can overheat.
- Remember that using the Dremel on materials with lead, crystalline silica, plastic, or on chemically treated lumber can create health hazards for you and others.
Assembling the Dremel
Always unplug the Dremel before changing accessories or collets.
To loosen the collet nut, first press shaft lock button and rotate the shaft by hand until the lock engages the shaft preventing further rotation.

With the shaft lock engaged, twist and use the collet wrench to loosen the collet nut if necessary. The collet nut must be loosely threaded on when inserting an accessory. Change accessories by inserting the new one into the collet as far as possible to minimize runout and unbalance. With the shaft lock engaged, finger tighten the collet nut until the accessory shank is gripped by the collet. Avoid excessive tightening of the collet nut when there is no bit inserted.
Different size collets (see illustration), to accommodate different shank sizes, are available for the Dremel. To install a different collet, remove the collet nut and remove the old collet. Insert the unslotted end of the collet in the hole in the end of the tool shaft. Replace collet nut on the shaft.


Balancing Accessories
For precision work, it is important that all accessories be in good balance. To true up or balance an accessory, slightly loosen collet nut and give the accessory or collet a ¼ turn. Retighten collet nut and run the Rotary Tool. You should be able to tell by the sound and feel if your accessory is running in balance. Continue adjusting in this fashion until the best balance is achieved.
Operation Instructions
Always hold the tool away from your face. Accessories can be damaged during handling and can fly apart as they come up to speed. This is not common, but it does happen.
Practice first on a piece of scrap material to get a feel for the weight and speed of the Dremel before beginning your project. The Dremel may jump back when it makes contact with an object; this is normal and can be controlled by holding it firmly. Keep in mind that the work is done by the speed of the tool and by the accessory in the collet. You should not lean on or push the tool during use.
Instead, lower the spinning accessory lightly to the work and allow it to touch the point at which you want cutting (or sanding or etching, etc.) to begin. Concentrate on guiding the tool over the work using very little pressure from your hand. Allow the accessory to do the work.
The object you are working on must be either firmly held in hand or clamped to a surface. Clamps can be found in the tool drawers of the Innovation Hub.
Usually, it is best to make a series of passes with the tool rather than attempt to do all the work in one pass. To make a cut, for example, pass the tool back and forth over the work, much as you would a small paint brush. Cut a little material on each pass until you reach the desired depth. For most work, the gentle touch is best. With it, you have the best control, are less likely to make errors, and will get the most efficient work out of the accessory.

Sliding "ON/OFF" Switch
To turn the tool "ON", slide the switch button forward toward the front of the tool.
To turn the tool "OFF", slide the switch button backward toward the back of the tool.
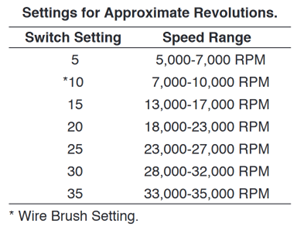
Operating Speeds
To select the right speed for each job, use a practice piece of material.
The Dremel is equipped with a variable speed dial. The speed may be adjusted during operation by presetting the dial on or between any one of the settings.

Needs for Slower Speeds
Certain materials, however, (some plastics and metals, for example) require a relatively slow speed because at high speed the friction of the accessory generates heat and may cause damage to the material. Slow speeds (15,000 RPM or less) usually are best for polishing operations employing the felt polishing accessories. They may also be best for working on delicate projects such as delicate wood carving and fragile model parts. (All brushing applications require lower speeds to avoid wire discharge from the holder.)
Higher speeds are better for carving, cutting, routing, shaping, cutting dadoes or rabbets in wood.
Hardwoods, metals and glass require high speed operation, and drilling should also be done at high speeds.
The best way to determine the correct speed for work on any material is to practice for a few minutes on a piece of scrap, even after referring to the chart. You can quickly learn that a slower or faster speed is more effective just by observing what happens as you make a pass or two at different speeds. When working with plastic, for example, start at a slow rate of speed and increase the speed until you observe that the plastic is melting at the point of contact. Then reduce the speed slightly to get the optimum working speed.
Some rules of thumb for speed:
- Plastic and other materials that melt at low temperatures should be cut at low speeds.
- Polishing, buffing and cleaning with any type of bristle brush must be done at speeds not greater than 15,000 RPM to prevent damage to the brush.
- Wood should be cut at high speed.
- Iron or steel should be cut at high speed. If a high speed steel cutter starts to chatter, this normally means it is running too slow.
Increasing the pressure on the tool is not the answer when it is not performing as you think it should. Perhaps you should be using a different accessory, and perhaps an adjustment in speed would solve the problem. Leaning on the tool does not help.
Dremel Accessories

Dremel Accessories Video Guide
Collets
Collets are used to hold Dremel attachments in place. The collet's size can be identified by the number of rings at the base and should match the size of the corresponding attachment. The attachment should fit all the way into the collet; if it doesn’t fit all the way, it’s too small. After tightening the attachment, check that the collet isn’t too small by ensuring that the attachment can’t slide out.

3/32" Collet

1/8" Collet
Collet and Collet Nut Attachments
The following attachments can be inserted directly into the collet and collet nut:
Bristle Brushes


Bristle brushes are good for general purpose cleaning. They should be used at speeds no greater 15,000 RPM. Avoid using pressure, as it can cause the wires to break and fly out. Let the spinning motion do the work.
Drilling Attachment

For drilling holes in objects of a variety of materials.
Engraving Cutters
![]()
This is made for intricate work on ceramics (greenware), wood carvings, jewelry and scrimshaw. They often are used in making complicated printed circuit boards. They should not be used on steel and other very hard materials but are excellent on wood, plastic and soft metals.
Sanding Accessories

Useful for fine sanding. Insert the rubber head into the desired sanding tube and attach to collet.
Mandrels
A mandrel is a shank with a threaded or screw head, which are required when you use polishing accessories, cutting wheels, sanding discs, and polishing points. A mandrel combined with a head attachment can be put on the Dremel.
Small Screw Mandrell

The Small Screw Mandrel is used by unscrewing the top screw, placing the screw through the desired attachment, and returning the screw into the mandrel hole. The entire attachment can then be placed into a collet.
The Small Screw Mandrel can be used with emery cutting wheels, as shown below.

Screw Mandrell

The regular Screw Mandrel, shown below, can be used with the felt buffing wheels by screwing them into the felt and then attaching them to a collet.
EZ Lock Mandrel

Attachment heads can be added to the EZ Lock by lining up the notches, pushing the gray plastic down, and twisting until securely locked. Ensure that the head is secure before operating to prevent injury.
EZ Lock Attachments
The EZ Lock mandrel can be used with the following attachments:
Abrasive Buffs

Used for general purpose buffing
Cutting Wheels

For creating cuts on the material specified on each disc, such as metal or plastic.
Cloth Polishing Wheel

For projects that need a soft-polished finish.
Nose Attachments
Sanding/Grinding Guide

Enhances precision and control during sanding and grinding uses, used with sanding wheels.
Multi-Purpose Cutting Kit

Useful for cutting drywall or door frames.
Shield Attachment

Useful for deflecting debris while cutting, sanding, grinding and polishing.
Circle cutter attachment

For cutting circles in material. The length of the pin on the metal can be adjusted to change the radius of the circle and the base plastic.