
Bambu H2C Instructions
Open a New Project
Open the Bambu Studio software. It is the green square sitting on the desktop. If a popup asks to update to program, then press “Skip this version” Located in the bottom right of the popup window. Click the “Create new project” button Located in the right left corner.
Add Your File
Drag and drop the file you would like to print onto the onscreen print bed. Press the auto orient button to put the object in the best position for printing. It looks like a square with an arrow coming out the side and says “auto” next to it. It is on the top toolbar third from the left. Put a copy of your STL file in the folder labeled “ThawSpace” in the files on the computer. It will be on the left side of the screen under the “This PC” dropdown. This is optional but helps a lab consultant troubleshoot if something goes wrong during the print. Take a 3D print form from the stack next to the computer and put the name of the file in the field named “Computer file (STL)”.
Filament Types
PLA
Pros: Smooth for painting over, biodegradable, easy to print
Cons: Not as strong, not food safe, low temperature resistance
ABS
Pros: Strong, bridges well, heat resistant
Cons: Can leave toxic fumes, not food safe, harder to print
PET-G
Pros: Food safe, high strength
Cons: More prone to stringing, not for detailed prints, harder to store in humidity
Tools
Located on the top bar over the virtual print bed.

Auto Orient
Automatically orients the selected object.

Arrange All Objects
Automatically orients all objects on the print bed. When given the drop down, select "Auto rotate for arrangements" and de-select "Allow multiple materials on same plate." "Avoid extrusion calibration region" will place the object over the calibration lines. The shortcut is A.

Move
Allows you to move selected objects (ctrl + left click objects to select multiple). Grab a colored arrow to move the object in only that direction. The shortcut is M.

Rotate
Allows you to rotate selected objects. Grab a colored arrow to rotate in only that direction. You can also use the drop-down menu to rotate the object more precisely. The shortcut is R.

Scale
Shrinks or enlarges the selected items. Use the corners to change all dimensions evenly. Otherwise, pull on the sides to only change one dimension. Use the drop-down to set the size by percentage or millimeters. When "uniform scale" is selected, changing one box will change all the others proportionately. The drop down will also have a button to reset the object to its original size, with ctrl + z as a shortcut.

Lay On Face
Highlights all the faces of an object. Clicking one of these faces will rotate the object and set that face on the print bed. This ensures full contact with the print bed.

Cut
Allows you to cut and/or separate selected objects. Control the angle and location of the cutting plane with the colored arrows. You can select which parts to keep in the drop-down menu. Don’t select “Cut to parts.”

Split to Objects
If you have multiple parts in one STL file, this tool will split each part into multiple objects. If the software detects that there is only one object in the file, then the button will be grayed out.
Underneath the filament selection is the Process window. At the top of that window, there should be two tabs:" Global" and " Objects". "Global" will change the settings of everything in the print bed while "Objects" will change the settings for just the selected objects. If you select "Global" and then split a file to objects, you can see the plate go from having one object to however many parts are in the file. This can be useful for printing/modifying only part of a file or printing by object.
Adjust Settings
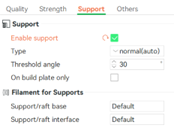
The screenshots below show the recommended settings. Here is more information on what each setting does. Use this to play around and try to improve your prints.
Ideal Settings


Infill
Controls the density of the pattern inside the print. Located under "Sparse infill" in the Strength tab. Recommended between 15% and 30%. A higher infill increases strength, but it also requires more filament, and as a result costs more and takes longer to print.
Infill pattern
Controls the line pattern for the infill. Changing this setting often has negligible effects, but can slightly affect filament amount.
Wall loops
Controls the amount of walls per layer. Located in the Strength tab. More walls will strengthen the print at a cost of using more filament and taking longer to print. Recommended is 2 loops.
Layer height
Controls thickness of each layer. Located in the Quality tab. Both the Bambu and Prusa printers are capable of 0.08mm to 0.28mm. A smaller value allows for more detailed designs, but will take much longer to print. Recommended 0.2 mm.
Skirt loops
Creates a loop(s) around the perimeter of the print. Located under "Bed adhesion" in the “Others” tab. Recommended value of 0. This can be used to stabilize the flow of filament or test adhesion.
Brim type and width
Creates a loop around the base of a print. Located under "Bed adhesion" in the “Others” tab. Recommended to be enabled with 5mm width. This prevents warping at the edges of the print and increases contact area for better adhesion.
Enable support
Allows the slicer to generate support material. Located in the Support tab. Recommend enabled with a normal(auto) type. Best practices for support is listed in the placement and support section.
Support type
Normal: Generates a squared structure underneath overhangs and detail greater than the threshold angle. Best for large overhangs and surfaces.
Tree: Creates round branches that shrink to a point. Do not use on large surfaces. Good for supporting smaller details
Threshold angle
Support will be generated for overhangs whose slope angle is below this angle. Strongly recommended 30 degrees.
Prime tower
Creates a tower on the back of the print bed between layers of multicolor prints. Located in the Others tab. Recommended to enable
Placement and Support
While the auto rotate feature does a good job, there are 3 main things to consider when deciding on placement of an object: Support, surface area, and detail.
Support: In general, try to reduce the amount of support. Place small parts and overhangs as close to the bed as possible to reduce support needed.
Surface area: Generally, it is a good idea to put the biggest side on the plate. This gives a bigger surface for the bed to stick to so that the print is more likely to stay flat on the bed.
Detail: Try to reduce the amount of support needed on fine details. Otherwise, taking off the supports can result in a rougher edge and ruin some of the detail. Also, try to rotate the object so that the grain of the layers doesn't mess with the detail.
Multicolor Printing
Note that multicolor prints must use the same type of filament throughout. To change the color displayed, click the colored square next to the filament type. To change the filament type, select the box displaying the filament type and select the desired plastic. If the desired filament type isn't displayed, click "Add/Remove filaments", select the one you want, then click "Confirm".

To change the color of one object, start by going to the "Objects" tab in the process section. Select the object that you want to color. Click on the colored rectangle next to the name and select the filament you want in the drop-down.

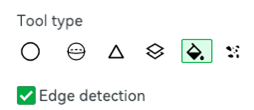
To print a multicolor part, select the color painting tool, indicated by the paint bucket on the right of the top toolbar, or press N. Next select the filament. Select the fill tool (small paint bucket, shown in image below). This will paint the entire surface of the print. The fill tool makes it faster to paint and fills in gaps with the same color. If you freehand with the other tools, there will likely be gaps and inner layers of different colors, which may mess up the print. When you are done painting, press the return button and click on the upper left and continue slicing.
Print By Object
If you are worried about a particular part failing, you can run a print by object instead of by layers. This way, the printer will print one object at a time. This is hard to do with many pieces since each object requires a lot of space. This method does not add much time to a print.
To change this setting, navigate to the "Others" tab, and go down to the setting "Print sequence," located under "Special mode." Select the drop-down and change the setting from "By layer" to "By object."